SWick

Sysadmin-by-Nature

Entries tagged "python".

Python script for Nagios to monitor SQL Server 2005 database mirroring
16th March 2009

Python Port of a Perl script I uploaded to NagiosExchange last year.

The script should be run on the PRINCIPAL with a read-only user. If you want to run it on the MIRROR, the user must have the Sysadmin role on it (ask Microsoft for the reason). Otherwise you get NULL.

You have to install the module pymssql manually if it's not shipped with your distro.

#!/usr/bin/python

import optparse
import pymssql
import sys

def main():

    #Connect to MSSQL Server
    try:
        con = pymssql.connect(host=host, user=user, password=password, database=database)
        cur = con.cursor()

    except TypeError:
        print 
        print "Could not connect to SQL Server"
        print 
        sys.exit(1)

    # Execute Query which checks if database is mirrored
    query="""SELECT d.name, m.mirroring_role_desc, m.mirroring_state_desc
             FROM sys.database_mirroring m
             JOIN sys.databases d ON m.database_id = d.database_id
             WHERE mirroring_state_desc IS NOT NULL AND name = """ + "'" + database + "'"

    cur.execute(query)

    results = cur.fetchall()

    for row in results:
        name  = row[0]
        role  = row[1]
        state = row[2]

    exit_val = 2

    if cur.rowcount > 0:
        if (role == "PRINCIPAL") and (state == "SYNCHRONIZED"):
            exit_val = 0

    if exit_val == 0:
        print "OK", "-", name, "-", role, "-", state
    else:
        print "CRITICAL - Check the mirrored database"

    con.close()


if __name__ == "__main__":

    # Command line Options
    parser = optparse.OptionParser()

    parser.add_option("-H", "--host",     dest="host",     metavar="HOST", help="IP or hostname with the mirrored database")
    parser.add_option("-d", "--database", dest="database", metavar="DB",   help="Name of the mirrored database")
    parser.add_option("-u", "--user",     dest="user",     metavar="USER", help="User to login")
    parser.add_option("-p", "--password", dest="password", metavar="PW",   help="Password of the user")

    if (len(sys.argv) < 2):
        args=["-h"]
        (options, args) = parser.parse_args(args)

    (options, args) = parser.parse_args()

    host     = options.host
    user     = options.user
    password = options.password
    database = options.database

    # Main function 
    main()
Tags: db, monitoring, mssql, python.
Dokumente in CouchDB wieder herstellen
2nd January 2010

Das Dateiformat bei CouchDB ist append-only, d.h. Veränderungen an der Datenbank ändern niemals bestehende Daten, sondern es wird immer am Ende angehängt. Das hat den Vorteil, dass bei einem Absturz o.ä., Daten nicht korrupt gehen können, keine langen Konsistenz-Checks beim Starten durchgeführt werden müssen und kein Locking stattfindet und dadurch extrem skalierbar ist.

Aber wie werden dann Daten in CouchDB gelöscht?

Beim Löschen eines Dokuments (Datensatz) wird dieses mit dem zusätzlichen Attribut _deleted und dem Wert true an die Datenbank angehängt. Da bei jeder Änderung eines Dokuments sich die sogenannte Revision ID ändert, erhält man auch beim Löschen eines Dokuments eine neue Revision ID. Dieses neue (angehängte) Dokument ist jedoch nur noch ein stub (Stumpf). D.h. es beinhaltet (fast) nichts mehr von seinen ursprünglichen Daten.

Einzig die Attribute ID, Revision ID und _deleted sind erhalten. Endgültig gelöscht werden Daten erst, wenn man eine Datenbank in CouchDB compacted. Da wird dann altes Zeug ausgemistet.

Das bedeutet, man kann auf gelöschte Dokumente weiterhin zugreifen, wenn man vorherige Revision IDs verwendet und kann damit z.B. Datensätze wieder herstellen. Da die letzte Revision ja nur noch ein Stumpf ist, muss also eine vorherige verwendet verwenden und es darf vorher solange NICHT compacted werden. Erst nachdem der Un-Delete durchgeführt wurde, darf man compacten. Ansonsten sind die Daten weg...

Details auf der Mailing Liste

Hier mal ein Beispiel, wie man das mit dem Python Modul für CouchDB macht. Hilfe dazu bekam ich auf der Mailingliste. Das Anzeigen von Dokumenten hab ich hier noch mit curl in einer Shell gemacht, damit es anschaulicher ist. Lässt sich aber auch direkt mit dem Python Modul machen. Testumgebung ist eine Ubuntu Karmic Installation, die mit CouchDB 0.10 und CouchDB-Python 0.6 daherkommt...

Anlegen einer Datenbank und Dokument erstellen

import couchdb
server = couchdb.Server()
db = server.create('testdb')
db['somedoc'] = {'type': 'Subtitle'}

Dokument anzeigen

curl -X GET 127.0.0.1:5984/testdb/somedoc
{"_id":"somedoc","_rev":"1-1d0d2e2f53eebed9dc22b38e05f7b585","type":"Subtitle"}

Dokument löschen

curl -X DELETE 127.0.0.1:5984/testdb/somedoc?rev="1-1d0d2e2f53eebed9dc22b38e05f7b585"
{"ok":true,"id":"somedoc","rev":"2-3369b4ffb9474a2ae9c22beb238a53a4"}

Wie man sieht, sagt CouchDB mit "ok":true, dass das Dokument gelöscht wurde und auch eine neue Revision ID bekommen hat.

Alte Revisionen anschauen

curl -X GET 127.0.0.1:5984/testdb/somedoc?rev=2-3369b4ffb9474a2ae9c22beb238a53a4
{"_id":"somedoc","_rev":"2-3369b4ffb9474a2ae9c22beb238a53a4","_deleted":true}

Na, etwas aufgefallen? Unser Attribut "type":"Subtitle" fehlt. Das ist der Stumpf, den ich zuvor angesprochen habe. Um eine vorherige Version mit allen Daten zu erhalten, dürfen wir nicht die letzte Revision ID nehmen, sondern eine davor.

curl -X GET 127.0.0.1:5984/testdb/somedoc?rev=1-1d0d2e2f53eebed9dc22b38e05f7b585
{"_id":"somedoc","_rev":"1-1d0d2e2f53eebed9dc22b38e05f7b585","type":"Subtitle"}

Tadaa. Unser altes Dokument. Um es wieder herzustellen, müssen wir diese Revision ID nutzen.

Dokument wieder herstellen

doc = db.get('somedoc', rev='1-1d0d2e2f53eebed9dc22b38e05f7b585')
db[doc.id] = doc

Mal sehen, was passiert ist:

curl -X GET 127.0.0.1:5984/testdb/somedoc
{"_id":"somedoc","_rev":"2-489230fd027dd8b7a1f96d1a0bd3928a","type":"Subtitle"}

Und siehe da. Unser Dokument ist wieder da. Und zwar erneut mit einer neuen Revision ID...

Tags: couchdb, db, nosql, python.
Monitoring IPVS in OpenNMS with Net-SNMP and Python
11th March 2010

I tried using the existing Net-SNMP Module but had no immediate success. To use it under 64-Bit systems, you have to change the Makefile. But even after that I only got zeros when walking the snmp tree. So then, I decided going for Python :-)

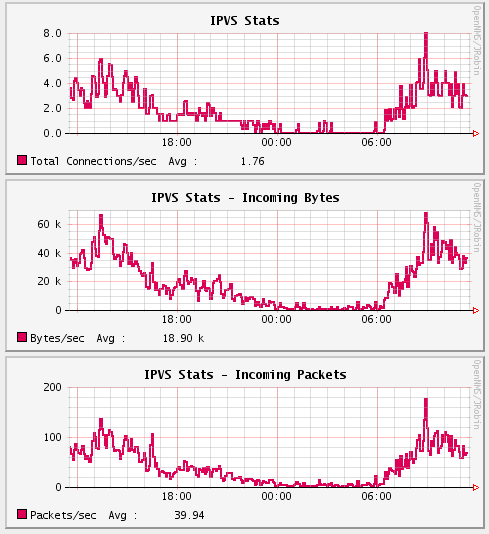
This is how it will look like:

First, our Python script getting the values. Deploy it on your load-balancer running IPVS and make it executable with chmod +x /opt/ipvs_stats.py.

/opt/ipvs_stats.py

#!/usr/bin/env python

import sys

filename = "/proc/net/ip_vs_stats"

try:
    f = open(filename,'r')

except IOError:
    print "Sorry, could not read file " + "'" + filename + "'"
    sys.exit()

data = f.read()


def hex2dec(s):
    """return the integer value of a hexadecimal string s"""
    return int(s, 16)

# first create a list of lists
data_list = [line.split()  for line in data.split('\n')]

stats = {}

stats['total_conns_sec']    = hex2dec(data_list[5][0])
stats['incoming_pkts_sec']  = hex2dec(data_list[5][1])
stats['outgoing_pkts_sec']  = hex2dec(data_list[5][2])
stats['incoming_bytes_sec'] = hex2dec(data_list[5][3])
stats['outgoing_bytes_sec'] = hex2dec(data_list[5][4])

if __name__ == '__main__':

    if len(sys.argv) < 2:
        print "\nError:\tNo arguments given.\n"
        print "Try:"

        for argument in stats:
            print "\t", sys.argv[0], argument
        sys.exit()


    if sys.argv[1] == 'total_conns_sec':
        print stats['total_conns_sec']

    if sys.argv[1] == 'incoming_pkts_sec':
        print stats['incoming_pkts_sec']

    if sys.argv[1] == 'outgoing_pkts_sec':
        print stats['outgoing_pkts_sec']

    if sys.argv[1] == 'incoming_bytes_sec':
        print stats['incoming_bytes_sec']

    if sys.argv[1] == 'outgoing_bytes_sec':
        print stats['outgoing_bytes_sec']

The script reads the values from proc and as they are hexadecimal, we have a function for converting them to integers. The script can get you 5 values but in this HowTo I left out the Outgoing values because I don't use LVS-NAT in my setup. But you can simply add them from the examples here...

Next step is to prepare SNMPd with our script so we can get the stats via SNMP.

/etc/snmp/snmpd.conf

# Monitoring IPVS

extend total_conns_sec    /opt/ipvs_stats.py total_conns_sec
extend incoming_bytes_sec /opt/ipvs_stats.py incoming_bytes_sec
extend incoming_pkts_sec  /opt/ipvs_stats.py incoming_pkts_sec

You can test it with

snmpwalk -v 2c -c <community> <IP> nsExtendOutline
NET-SNMP-EXTEND-MIB::nsExtendOutLine."total_conns_sec".1 = STRING: 3
NET-SNMP-EXTEND-MIB::nsExtendOutLine."incoming_pkts_sec".1 = STRING: 62
NET-SNMP-EXTEND-MIB::nsExtendOutLine."incoming_bytes_sec".1 = STRING: 31928

As you can see, I use nsExtendOutline instead of nsExtendResult. The reason is, that our values are surely greater than 127 and most systems require the exit value to be in the range 0-127, and produce undefined results otherwise. Therefore in our script we don't use sys.exit() but print the values to STDOUT instead.

The OID is an ASCII representation of your chosen string after the "extend" command. To see it, use -On in your snmpwalk.

snmpwalk -On -v 2c -c <community> <IP> nsExtendOutline
.1.3.6.1.4.1.8072.1.3.2.4.1.2.15.116.111.116.97.108.95.99.111.110.110.115.95.115.101.99.1 = STRING: 4
.1.3.6.1.4.1.8072.1.3.2.4.1.2.17.105.110.99.111.109.105.110.103.95.112.107.116.115.95.115.101.99.1 = STRING: 74
.1.3.6.1.4.1.8072.1.3.2.4.1.2.18.105.110.99.111.109.105.110.103.95.98.121.116.101.115.95.115.101.99.1 = STRING: 33322

Now we can configure OpenNMS for collecting the data

/etc/opennms/datacollection-config.xml

...
...
...

      <group name="ipvs" ifType="ignore">
        <mibObj oid=".1.3.6.1.4.1.8072.1.3.2.4.1.2.15.116.111.116.97.108.95.99.111.110.110.115.95.115.101.99" 
                instance="1" alias="ipvsTotalConnsSec" type="octetstring" />
        <mibObj oid=".1.3.6.1.4.1.8072.1.3.2.4.1.2.17.105.110.99.111.109.105.110.103.95.112.107.116.115.95.115.101.99" 
                instance="1" alias="ipvsPktsSecIn" type="octetstring" />
        <mibObj oid=".1.3.6.1.4.1.8072.1.3.2.4.1.2.18.105.110.99.111.109.105.110.103.95.98.121.116.101.115.95.115.101.99" 
                instance="1" alias="ipvsBytesSecIn" type="octetstring" />
      </group>
...
...
...

      <systemDef name="Net-SNMP">
        <sysoidMask>.1.3.6.1.4.1.8072.3.</sysoidMask>
        <collect>
          <includeGroup>mib2-host-resources-system</includeGroup>
          <includeGroup>mib2-host-resources-memory</includeGroup>
          <includeGroup>mib2-X-interfaces</includeGroup>
          <includeGroup>net-snmp-disk</includeGroup>
          <includeGroup>openmanage-coolingdevices</includeGroup>
          <includeGroup>openmanage-temperatureprobe</includeGroup>
          <includeGroup>openmanage-powerusage</includeGroup>
          <includeGroup>ucd-loadavg</includeGroup>
          <includeGroup>ucd-memory</includeGroup>
          <includeGroup>ucd-sysstat</includeGroup>
          <includeGroup>ucd-sysstat-raw</includeGroup>
          <includeGroup>ucd-sysstat-raw-more</includeGroup>
          <!-- <ipvs> -->
          <includeGroup>ipvs</includeGroup>
          <!-- </ipvs> -->
        </collect>
      </systemDef>
...
...
...

Note the type of "octetstring". If you look at the type of this OID from the walk above, you’ll see it is "string". RRDtool and JRobin can’t store string data, thus it needs to be converted to a number. Setting the type to "octetstring" causes this to happen (it is converted to a gauge).

And finally we can build pretty graphs out from it:

/etc/opennms/snmp-graph.properties

...
...
...

reports=...\
..., \
ipvs, ipvs.incoming.bytes, ipvs.incoming.packets \
...
...
...
report.ipvs.name=IPVS Stats
report.ipvs.columns=ipvsTotalConnsSec
report.ipvs.type=nodeSnmp
report.ipvs.command=--title="IPVS Stats" \
 DEF:totalconns={rrd1}:ipvsTotalConnsSec:AVERAGE \
 LINE2:totalconns#DE0056:"Total Connections/sec" \
 GPRINT:totalconns:AVERAGE:"Avg \\: %10.2lf %s" \

report.ipvs.incoming.bytes.name=IPVS Stats Incoming Bytes
report.ipvs.incoming.bytes.columns=ipvsBytesSecIn
report.ipvs.incoming.bytes.type=nodeSnmp
report.ipvs.incoming.bytes.command=--title="IPVS Stats - Incoming Bytes" \
 DEF:bytes={rrd1}:ipvsBytesSecIn:AVERAGE \
 LINE2:bytes#DE0056:"Bytes/sec" \
 GPRINT:bytes:AVERAGE:"Avg \\: %10.2lf %s" \

report.ipvs.incoming.packets.name=IPVS Stats Incoming Packets
report.ipvs.incoming.packets.columns=ipvsPktsSecIn
report.ipvs.incoming.packets.type=nodeSnmp
report.ipvs.incoming.packets.command=--title="IPVS Stats - Incoming Packets" \
 DEF:packets={rrd1}:ipvsPktsSecIn:AVERAGE \
 LINE2:packets#DE0056:"Packets/sec" \
 GPRINT:packets:AVERAGE:"Avg \\: %10.2lf %s" \

...
...
...
Tags: ipvs, monitoring, opennms, python.
Probiere und Erwarte
3rd July 2010

Obwohl ich kürzlich schmunzelnd den Artikel The forgotten art of error checking las, so war ich letzte Woche dann doch selbst davon betroffen.

Ich hatte mir ein Python Skript fürs Monitoring gebaut, welches das Backlog einer Datenbank voller serialisierter Objekte zur Verteilung überwacht.

Das hat bisher sehr gut funktioniert, jedoch wunderte ich mich Donnerstags, warum das Backlog plötzlich 100.000 Einträge enthielt und das Monitoring mich nicht informierte. Nach einer kurzen Analyse fand ich die Ursache.

In die Datenbank wurde so oft hineingeschrieben, sodass mein Skript sie jedesmal in einem ge-lockten Zustand vorfand und das Skript somit fehl schlug.

Wenn unter Windows ein Programm erfolgreich war, gibt es den Wert 0 zurück. Bei Problemen den Wert 1 oder größer. Das Problem war nun, dass das Monitoring immer dachte, das Backlog habe sich erholt, da es bei der Data-Collection den Wert 1 erhielt. D.h. das Backlog wuchs stetig an und das Monitoring glaubte aber irrtümlich, dass es wieder auf normalem Stand ist.

Die Moral von der Geschicht:

Probiere und Erwarte...

Auf Deutsch: Benutze das Exception Handling deiner Programmiersprache!

Mittlerweile hab ich das Skript um ein Try-Except erweitert, sodass bei Fehlerfall ein sehr hoher Wert zurück gegeben wird. Das verfälscht evtl. den Graphen aber ein Problem fliegt nicht mehr unter dem Radar...

Tags: python.
recutils JSON output
8th June 2014

Quick Python one-liner to get JSON output from recutils

data.rec

%rec: movies

Id: 4
Title: Banana Joe
Country: Italy  |  West Germany
Date: 1982
Director: Steno
Genre: Comedy
Length: 93
Add_date: 05/06/2008
Audio: German (MP3)
Identifier: 141
Location: Box 1
Media: DVD
Amount_of_Media: 1
Rating: 6
Video_file: /media/cdrom0/Banana-Joe.avi
Video_format: DX50
Viewed: 1
Borrower: none
Favourite: 0

Id: 2
Title: Baraka
Country: USA
Date: 1992
Director: Ron Fricke
Genre: Documentary
Length: 96 min
Add_date: 04/06/2008
Identifier: 858
Location: Box 1
Media: CD
Amount_of_Media: 1
Rating: 0
Video_file: /media/cdrom0/Baraka.avi
Video_format: divx
Viewed: 1
Borrower: none
Favourite: 0

Python one-liner

$ rec2csv data.rec | python -c 'import csv,json,sys; print(json.dumps(list(csv.DictReader(sys.stdin)), indent=4))'

Output

[
    {
        "Rating": "6", 
        "Identifier": "141", 
        "Title": "Banana Joe", 
        "Add_date": "05/06/2008", 
        "Country": "Italy  |  West Germany", 
        "Favourite": "0", 
        "Video_file": "/media/cdrom0/Banana-Joe.avi", 
        "Amount_of_Media": "1", 
        "Director": "Steno", 
        "Genre": "Comedy", 
        "Length": "93", 
        "Location": "Box 1", 
        "Borrower": "none", 
        "Media": "DVD", 
        "Date": "1982", 
        "Video_format": "DX50", 
        "Audio": "German (MP3)", 
        "Id": "4", 
        "Viewed": "1"
    }, 
    {
        "Rating": "0", 
        "Identifier": "858", 
        "Title": "Baraka", 
        "Add_date": "04/06/2008", 
        "Country": "USA", 
        "Favourite": "0", 
        "Video_file": "/media/cdrom0/Baraka.avi", 
        "Amount_of_Media": "1", 
        "Director": "Ron Fricke", 
        "Genre": "Documentary", 
        "Length": "96 min", 
        "Location": "Box 1", 
        "Borrower": "none", 
        "Media": "CD", 
        "Date": "1992", 
        "Video_format": "divx", 
        "Audio": "", 
        "Id": "2", 
        "Viewed": "1"
    }
]
Tags: db, nosql, python, recutils.

RSS Feed

"People said I should accept the world. Bullshit! I don't accept the world." -- Stallman